10 steps to on-page image SEO optimization

Image positioning and SEO optimization of image files (so-called image SEO) is not limited to checking the size and resolution of images or choosing the right format. Above all, images should be properly described - it is the SEO descriptions of images (specifically: the presence of keywords in the alt attribute of the image) that are one of the most important ranking factors. However, this does not involve pushing a string of keyword phrases by force - this kind of foul play will not be liked by either the bot or the user.
It’s a good idea to start optimizing images on the web by properly preparing images for publication. The next step is to fill in the most important graphics tags in the CMS.
However, that’s not all - on your site, also take care of friendly image url, structured data and sitemap for graphics. As you can see, there’s a lot to do on the topic of images - and on many sites this topic is still neglected. This is a good chance to stand out in your industry and implement simple fixes that your competitors may have forgotten about.
Why you should optimize images and graphics for your website
.
In fact, on any website, regardless of its type, properly performed SEO optimization of images should benefit you. Here’s what you’ll gain by doing so:
- You’ll reduce page load times. This will be achieved primarily by properly processing and optimizing graphics before adding them to the repository (simply changing the file extension from a high-resolution PNG to a properly cropped JPEG can reduce the size of the graphic by up to tens of percent).
- Improve your chances of appearing in the image search engine. Of course, just uploading images on a product sheet or in an article does not invalidate the possibility of appearing in Google Image (the algorithm associates the content on the page with a given image, even if it is not well described or has no description - and can position graphics on phrases included in the title of the subpage), but the best effect comes from properly filling in the image tags in the CMS.
- Increase traffic and engagement on the site. Users searching for products in a search engine for graphics are most often already on the path to purchase - if, thanks to well-described images, they end up on the product subpage, which UX-wise is done to perfection, we have a good chance of conversion or moving further down the page - to the gallery of images showing the product or other related products and services.
.4. Relatively, you will notice the effect quickly. It usually takes a few months for the first effects of an increase in traffic from search engine graphics, and it will work even faster for industries that do not care about graphic descriptions (this way you will be one step ahead of the competition).
.5. You have a chance to increase sales, and you risk nothing. It’s not a well-known fact today that we buy with our eyes, so visual marketing for products and the path to the site from graphics are of great importance in many industries - optimizing images on the site can therefore realistically translate into profits.
.
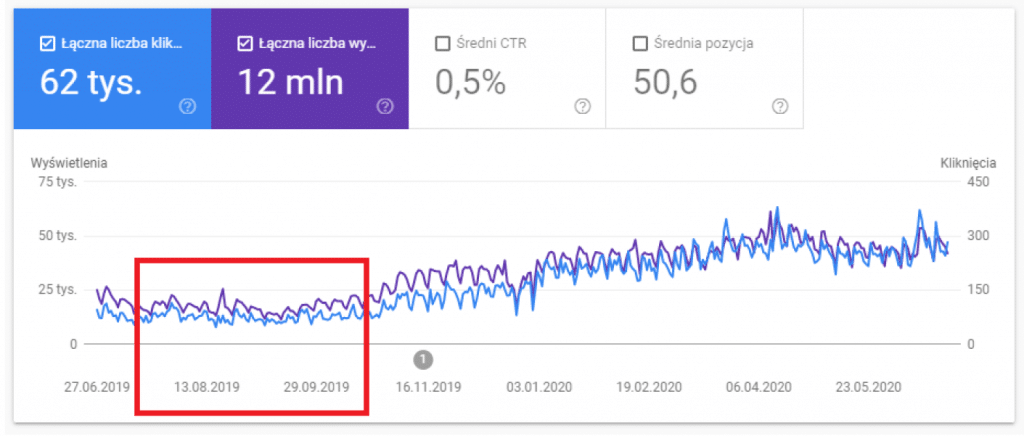
Example of effects from on-page SEO optimization of images - I applied simple corrections to image descriptions + added alts; the number of impressions per day increased from about 10-20 thousand to about 45-52 thousand; you can find data on graphic views and clicks in the Google Search Console panel of your site.
And now: hyc! From theory and the potential benefits of image SEO, we’ll quickly move on to practice - you’ll learn how to do the good work step by step, i.e. make sure your site’s images are properly SEO optimized.
What is image file optimization
.
On-page image optimization consists primarily of creating their descriptions (according to good SEO practices), applying compression and selecting the right file types. It is worth remembering to always choose images that are thematically related to the content on a given page.
Watch the competition in e-commerce - if you have the opportunity, invest in your own product images to complement the content from the manufacturer. You’ll stand out in search results (especially if your competitors are only using images duplicated on many other sites).
To get started, check out the image SEO optimization checklist below - tick off each point on your site, see the following paragraphs for detailed advice.
SEO and photo optimization in 10 steps:
.
.1. Use descriptive but concise file names .2. Do not use spaces and underscore character in file names .3. Fill in the alt tag correctly (it’s an important ranking factor) .4. Don’t push phrases by force - neither in the photo title nor in the alt .5. Compress and crop photos (remember mobile first index) .6. Choose the right file type (WebP or JPEG instead of PNG) .7. Use responsive images (srcset attribute) .8. Select images related to the article topic .9. Make your own product images (show the product from all sides) .10. Create a sitemap for images .
File naming - how to properly name images on a page?
.
The rule is simple: the name of an image file must not be a random string of characters. Also, do not use very long names (e.g., put whole sentences or a dozen keywords in the file name). Separate individual words in the image name with a ”-” divider - it works better as a separator than an underscore character or a space (the bot can skip such separators and combine several words into one).
Also, don’t combine with the name itself - don’t spam, briefly and succinctly indicate in the title what the graphic contains (and optionally also use the knowledge from the tutorial on long tail positioning - a long tail in the title or description of the image can work wonders). Based on the titles of the graphics, it is a good idea to create their url-e on the site - this will make the image addresses friendly to both robots and users.
There is another advantage of order in the names of image files - it will be easier to manage them on the repository and server side (you will search for specific files by keywords, if necessary).
File names - examples of good and bad practices
.
Proper file name:
- red-dress-for-summer.jpg .
Incorrect file names:
- photo321312354hd1920x1080.jpg
- reddress_dress.jpg, reddress_dress.jpg .- red-dress-for-summer-for-girls-elegant-dress-for-wedding-lace-midi-with-slit-and-fallbows.jpg
Note! In many industries, the converting phrases may be product numbers, EAN numbers and/or manufacturer codes. If you’re running an e-commerce business (especially one with a large number of similar products), include this data both on the product card and in the names and alt tags. A common scenario is also to search for a product based on the EAN number to find documentation or instructions for a particular product.
The chance of conversion from such sessions is low, but among other reasons, this is why in e-commerce it is worthwhile to display related products on the product card (even if a user is looking for a phone manual, he might be tempted to buy a case, headphones or protective glass if you include such listings in your e-store).
Alt tags - how to fill in the alternative description of a photo?
.
When it comes to images on a page, it is the alt tag (i.e., the alternative description of the photo) that is the most important ranking factor.
The alt description allows bots to more easily understand what’s in the photo and thus select relevant graphics for queries in Google’s image file search engine. Another function of the alternative description is for screen readers to read this content, or to display it in place of the photo when the page fails to load the graphic for some reason.
How to properly populate alt graphics on a page?
.
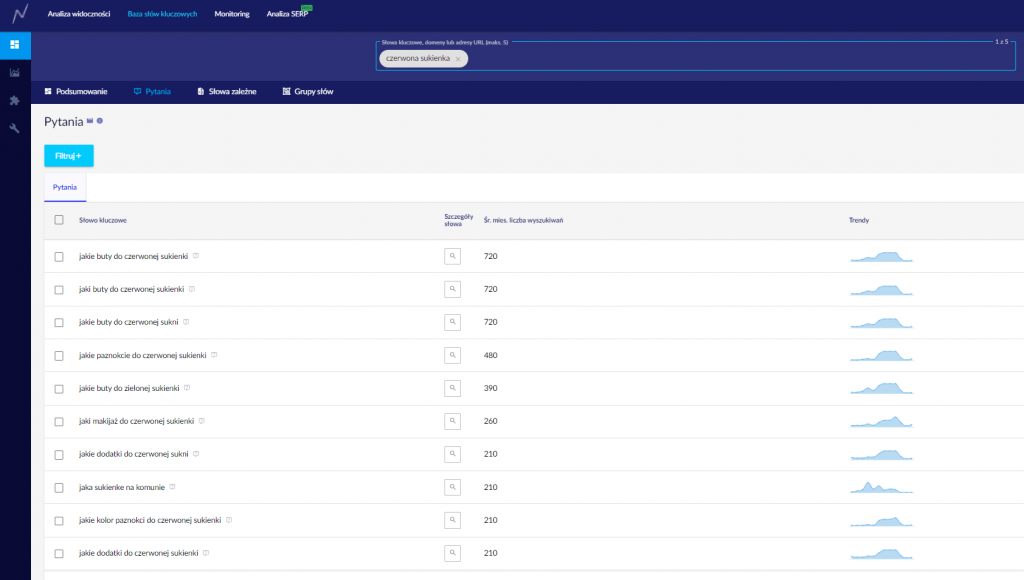
Alt descriptions should naturally represent what’s in the image, while including keyword phrases. To create a good and natural alt description, you can do a simple exercise - try to describe in about 5-15 words to a bystander what you see in a given image. Voilà! You probably have a good description for the alt. And it will be perfect if you additionally support yourself with the keyword database in Senuto. For example:
-
In the keyword database, search for “red dress” .2. Open a tab with frequently asked questions involving the aforementioned phrase .
-
It only took two clicks to generate some ideas for guide articles: “what shoes for red dress” (about 720 searches per month); “what nails for red dress” (480); “what makeup for red dress” (260). .4. Create content that answers users’ frequent questions - link content with each other (to increase the depth of the session), add links to the offer, and mid-text place images with an alt description, such as “shoes for red dress” .5. Depending on the site’s information architecture, the above-mentioned questions can also serve as H2 headers in the category description with red dresses - combine, test and think which option will give the best results.
Correct piece of html code with image description (included file name, photo title and alt):.
<img src="https://domena/buty-adidas-KP1254.jpg" alt="white adidas shoes - sneakers low" "title: white adidas shoes KP1254" />..
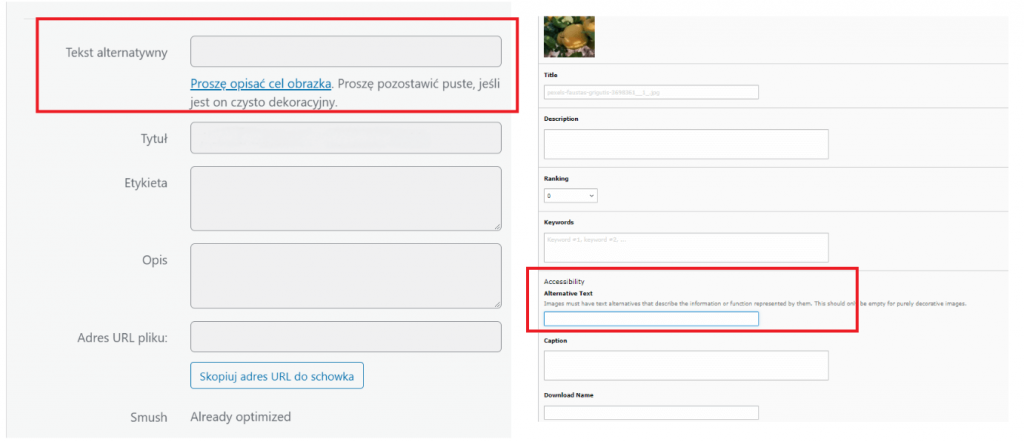
You can find the fields to fill in alt and title of the image in most CMS you will find in the file repository - above examples from Wordpress and Typo3 (when you enter the image or when you add the image to the page, you can fill in the necessary data about the file)
Reduce the size of graphics
.
The general rule of thumb is that the less the graphics weigh, the better the page speed score of the site. How to check if the size of the graphics on the page is correct? For this purpose, you can use the Page Speed Insights tool:
- go to Page Speed Insights (https://developers.google.com/speed/pagespeed/insights/) .2. enter the address of your page or subpage you want to test .3. in the results, check the tabs “display images in new generation formats”; “resize images” and “defer loading images off-screen” .
You can also generate a report of all the images on the page with their sizes in the Screaming Frog tool (and, for example, additionally sort in an XLS file. images from the largest to the smallest on the page - this way you can also check correlations between loading times and image sizes on individual pages).
How to optimize image sizes?
.
A great solution is the trivially easy-to-use ImageOptim tool (https://imageoptim.com/pl), which also has a web-based interface (you don’t have to install anything: https://imageoptim.com/online) - you select the file to compress, the target quality (the lower it is, the less the file will weigh) - and you’re done.
Note! Some CMSs have built-in mechanisms or optional plug-ins to automatically optimize image sizes when uploading images to the repository. Such a solution can significantly speed up the photo optimization process.
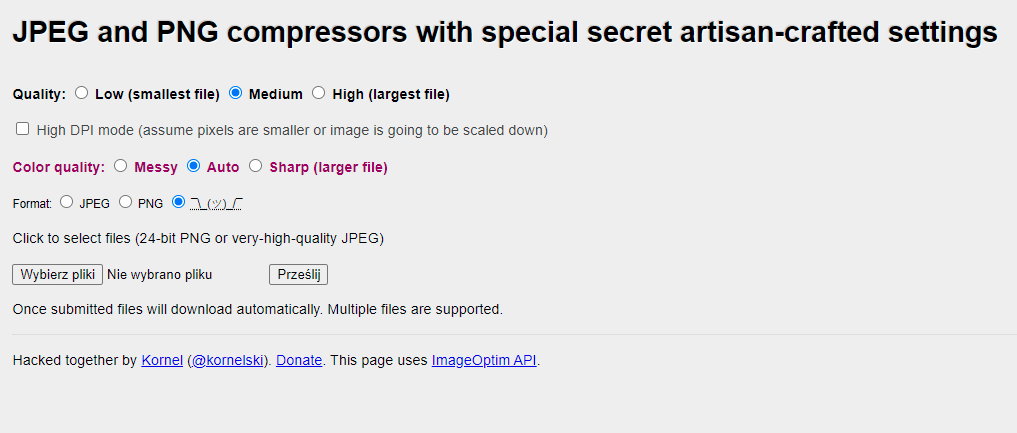
It couldn’t be simpler - ImageOptim’s web-based interface for image size optimization.
Image cropping - flexible and responsive images (srcset)
.
A common mistake is to put too-small or too-large images on the page. The solution to this problem is to use the mechanism of responsive graphics on the page. Several variations of the image are included in the html code using the srcset attribute.
Example code snippet:
<picture>

<source srcset="dress-big.jpg" media="(min-width: 1024px)">

<source srcset="dress-medium.jpg" media="(min-width: 400px)">

<img src="name-picture.jpg" alt="alt description of sample photo">

</picture>
.
In the example given, in the case of a horizontal screen resolution falling within the range 400-1023, the image dress-medium.jpg will be displayed, on devices with a screen width of 1024 - the image dress-big.jpg will be displayed. “<img src=” indicates the location of the base file (e.g., browsers without support for the tag).
This method can also be used to serve WebP files as an alternative to jpeg, for example:
<picture>

<source srcset="dress-big.webp" type="image/webp" media="(min-width: 1024px)">

<source srcset="dress-big.jpg" type="image/jpg" media="(min-width: 1024px)">

<source srcset="dress-medium.webp" type="image/webp" media="(min-width: 400px)">

<source srcset="dress-medium.jpg" type="image/jpg" media="(min-width: 400px)">

<img src="name-photo.jpg" alt="alt description of sample photo">

</picture>
..
Selecting the right graphic format
.
One format won’t work for everything:
- JPG - is the most universal, all browsers can handle this format without a problem; .- SVG - it is worth using for logos and icons; .- PNG use as a last resort - files of this type are very heavy, but will work well in two cases: if you want to keep a transparent background on your image (PNGs preserve the alpha channel) or you are presenting tables / charts / screenshots, where compression can “smear” the image; .- New generation graphic formats - combine the advantages of PNG and JPG, but in some cases may require an additional plug-in to implement (e.g. Wordpress from the panel will not support the WebP extension, plug-ins such as WebP Express, EWWW Image Optimizer will be required) .
Graphics in new generation formats
.
The aforementioned PageSpeedInsigts tool, after analyzing page performance, often suggests a fix: “serve images in next-generation formats.” What does that actually mean? It’s an issue of on-page SEO tech optimization that makes graphics load faster. In practice, implementing next-generation formats boils down to using image files with WebP, JPEG200 or JPEG XR extensions on the page.
- WebP - an extension developed by Google that allows you to encode images in both lossy and lossless modes; it features better compression efficiency than JPG and is slowly becoming the standard for graphics on the web. The disadvantage is that this format is not compatible with some browsers (current compatibility can be checked, for example, at https://caniuse.com/?search=webp). The MIME type, or two-part identifier, of this file format on the Internet is image/web. .- JPEG2000 - a slightly more efficient storage standard than the traditional JPEG extension; unfortunately, a drawback is compatibility problems on many browsers; extensions used within JPEG2000: .jp2, .jpx, .jpm, .mj2; MIME types: image/jp2; image/mj2; image/jpx; image/jpm; .- JPEG XR (JPEG extended range; formerly HD Photo) - this Microsoft-developed format was intended to replace JPEG and JPEG2000; technically, it is closer to WebP - mainly because of its lossless compression option and alpha channel support (“transparency” of graphics); extensions used are .jxr, .hdp, .wdp; MIME types: image/vnd.ms-photo; image/jxr
Note! If you are planning to implement the WebP format, you can easily work around the problems with this format in some browsers. Just use the
<picture>

<source srcset="dress.webp" type="image/webp">

<source srcset="dress.jpg" type="image/jpeg">

<img src="image.jpg">

</picture>
.
This code snippet implements the scenario: a WebP-supported browser will display images in this format, and browsers without WebP support will display images in JPEG format.
Sitemap for website graphics
.
In the case of a sitemap for graphics (that is, a file in XML format - placed on the server, containing a list of pages on the site), there are two options to choose from:
- add images to an existing site sitemap .2. create a separate sitemap - including only image files .
Why is this important? Because it makes it easier for bots to read images that in some cases they wouldn’t scan on their own (e.g., images on a page implemented with JavaScript codes).
Free image optimization tools
.
Finally - SEO tools, a must have for every SEO photo optimizer:
- Image Online Convert - converting a file to WebP format: https://image.online-convert.com/convert-to-webp
- ImageOptim - an online tool or panel for optimizing the weight of images: https://imageoptim.com/pl
- JPEGmini; JPEG.io; Kraken, Squoosh - optimize JPG images; convert various types of files to JPG format: https://www.jpeg.io/ ; https://kraken.io/ ; https://squoosh.app/ https://www.jpegmini.com/
- CanIuse - here you will check the compatibility of extensions with particular browsers: https://caniuse.com/?search=webp
- Remove.BG - a tool for removing backgrounds from photos: https://www.remove.bg/
- Verexif - a tool for removing EXIF (exchangeable image file format) data from photos, i.e. photo metadata:https://www.verexif.com/en/
- PageSpeedInsights, Lighthouse - site performance tests for, among other things, Web Core Vitals but also for SEO optimization of images on the site .- Google Developer Tools - instructions for creating a sitemap with images (https://developers.google.com/search/docs/advanced/sitemaps/image-sitemaps?hl=pl)

Jacek Krajl
Z marketingiem internetowym związany od ok. 10 lat. W tym czasie zrealizował kilkadziesiąt mniejszych i kilka dużych projektów. Główne specjalizacje: audyty SEO, strategia contentowa, content marketing, pozycjonowanie. Obecnie kierownik projektu + koordynator ds. mediów społecznościowych i pozycjonowania w Grupie NEUCA, po godzinach konsultant SEO w ambitnych projektach (obecnie też m.in. w Senuto). Z ostatnich sukcesów: 1. miejsce w raporcie widoczności contentu w 87 tys. e-commerce w Polsce (Senuto, "E-commerce w Polsce 2020"). Współtwórca"Niepodstawowego przewodnika po SEO copywritingu".
All articles →